Monday, March 29, 2010

Infant Blanket

I had the day off, and instead of working on any UFOs (bad me! slap on the wrist!), I loafed around, went shopping with a friend, then took a Benedryl induced nap (darned Bradford Pear trees!) But that's okay, because who doesn't need one of those days every now and then. It was very nice.


So, today I thought I'd show you the project that inspired me to quilt and craft again. I take care of an 8 month old baby during the week. I've been looking through a book of activities to help enrich his playtime, and kept seeing references to texture blankets, and quilts with bright patterns. This was 3 months ago, so "Tigger" as I will call him here, was not crawling yet, and we were still having plenty of tummy-time. And I remembered that a few years back, I had made texture squares for the day care I worked at. Burlap, satin, pleather, suede, chenille, and a fluffy stuff that looks like I skinned a Smurf. And I still had more than half of what I purchased for those blocks.


I decided that I could make a blanket with both textures and patterns, and immediately headed to Wal-Mart to find some. I only purchased 1/4 yard cuts, because I knew I wasn't going to make many squares, and as I was picking out patterns, I also realized I had a fabric stash I could raid. I ended up with only 5 pattern fabrics from Wal-Mart, then added 10 more from my stash. My plan was to create one, two-sided blanket for playtime: Side A was patterns and colors, Side B was textures. I cut 8 1/2 inch squares of the patterns, so that with a 1/4 inch seam, I would have 8 inch blocks. I then sewed my textures together in larger chunks, and arranged them in a more haphazard placement so that everywhere the baby touched, he would feel something new. Since trying to do any kind of quilting would be impossible, I tied the quilt in the middle of every other square. And I used satin, with iron-on interfacing for stability, for the binding.

And it turned out awesome! I remembered how much fun it was to piece together the quilt tops, and how satisfying it is to sew on the binding. And then I wanted to do more, and then I realized I had plenty of things I could finish, and now here I am. Letting everyone know that UFOs do not need to remain unfinished! They can be completed, just as I completed this infant quilt. Which Tigger loves. That blue Smurf fur is everyone's favorite, though!

Sunday, March 28, 2010

Preparation for Upcoming Projects

I know I haven't been posting in a few days, but that doesn't mean I haven't worked on projects. But most of what I have done has been research on upcoming stuff. And, I created a page here on ALL of my current UFOs. If you want a sneak peek at upcoming projects, you can read about them, how they got started and when and why they were abandoned. So this weekend, I searched my favorite quilting board/forum for ideas to finish my Winter Sampler Quilt. I started on the Block of the Month threads and scanned, and clicked on links, and scrolled, until I came up with several blocks I really liked that fit with the style of blocks already completed. The only problem is that two of the ones I really liked....were paper pieced.


I've never paper pieced before. Heard about it, seen how beautiful the quilts are, and how perfect the points are, which is why paper piecing is preferred for some block styles, but have no clue how to go about doing it. I have an aunt who quilts, and I know she has entered some of her pp quilts in shows before, and they are beautiful. So, I sent her an e-mail to figure out if she had any suggestions. Then I googled paper piecing. And found some great videos that helped me understand the process. Which is a Whole Lot simpler than I thought. ( I thought you cut out each paper piece, sewed the paper to the fabric, then somehow reattached the paper pieces, and the foundation of the paper was what made the points so perfect, and allowed you to use scraps regardless of where the bias was.)


In case you've never paper pieced before, it's so Easy! Print or trace your design onto paper (preferably paper designed to dissolve or remove easily) or interfacing. Start by making sure the pieces you choose are large enough to cover the selected area on the pattern, first piece right side up on the back of the printed side of paper. (BTW, the image should be reversed when you trace it, which it will be if you get it from a pattern book or online, but if you make it yourself, which you can, reverse it to trace) The #2 piece is place right-side together with the first piece, with the bulk of the material going away from where it's supposed to end up, since you will be ironing it over to the correct area. (If you're interested in learning how to pp, PLEASE don't use these instructions! Use this video, or one like it).


So, I needed to resize one of the patterns, which also turned out to be easier than expected. Then , I realized I needed to practice so I didn't mess up my beautifully resized pattern. I used the original 4 inch pattern and some of my scraps and created this:
I like it! It was so easy! Okay, I know you can't really tell what the pattern was supposed to be, since I didn't do such a hot job with planning the color arrangement (red, white, and blue does not a rose make). But for the 12 x 12 inch blocks when the only fabric colors are blue snowflakes and snowmen, it should be fantastic! Once I squared up all those rough and crazy edges, it's a nice block. Don't know what use I'll find for a 4 inch 4th of July block. I guess that means I'll be making another quilt at some point. Maybe a year quilt, 4 inch roses for each month. It's an idea....

Thursday, March 25, 2010

Stain Removal...Help?

I do not get to work on any fun projects tonight. I am extremely disappointed. Got some cross-stitch done this am, but I came home, excited to begin hemming pants. I can't wear said pants right now, but as I am down another pound as of today, the day will come sooner than you think! And these pants have been pinned and waiting for about 2 years.

But, I came home from a surprise hair appointment (they baby had a doctors appt at 12:30, so I got out Early!) to a mess of trash all over the living room floor. We are slowly working on letting the dog out of his crate while we are not home, and he was only out for about an hour. He's gone for 3 before with no destruction. Not today. No big deal, though, normally. Swat him across the nose, pick up the trash, drag dog to trash can, swat nose again to show him he's not allowed...except for the liquid ink pen he chewed up.

Big, blue stain in the middle of the carpet, and about twenty small dots around the apartment. He apparently got it on his paw, then tracked it everywhere he walked. I forgot to take a picture of the original stain. Yay. I mean, really. Yay. So I did out my cleaning manual: the Queen of Clean. The Queen says for ink stains on carpet, blot with rubbing alcohol. I grab my bottle and realize, I'm gonna need to go to the store. I don't have enough. But I begin, and some of the stain is coming up, but it's leaving a pink stain behind. Uh,oh. So, I'm off to the store to buy more. I also picked up more vinegar and club soda, other Queen of Clean staples, used for all sorts of goody cleaning.

The rubbing alcohol does remove the blue, but there's a horrible pink stain remaining. I try the club soda. Ah...success. But the pink remains. More blue comes up, I can see it on my "cleaning towels", but the pink...is glaring. I move to the small dots, and the club soda bubbles up the stain on all of those, leaving a tiny pink on only a few. And now I return to the big one.

Back and forth with the rubbing alcohol and the club soda, still removing blue, but the pink remains. Argh!! We're moving in a few months. This stain will mean we have to replace the carpet! Not an option! Back to the Queen; she suggests if the stain remains, try your carpet cleaner or basic shaving cream (which I actually have right now because I'm making discovery bottles for the baby to play with). Surprisingly, even though the foam never turns colors, I can tell the stain is lightening. However, I have been working on this for an hour now, my fingers are blue, 3 full size towels are wet, and I think I'm getting a small buzz from smelling the rubbing alcohol. Hmmm...maybe it's time to take a break, let the carpet dry, and see if anyone has ANY ideas.

So any ideas? This is what remains of the ink. Short of pouring bleach on the tan carpet, I can't think of anything that will definitely get rid of the pink, or even if bleach would work. I know I would have a perfectly white spot on the carpet around the stain, but that doesn't help either. Now I have a new UFO. Getting rid of this dang stain!

Wednesday, March 24, 2010

Meet Pepe...


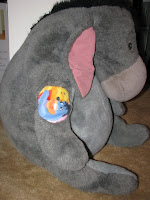
...the reason for today's UFO. If you know me, you know that I collect Eeyores. At last count, I had around 47. Could be worse, I know, but two of them are Large, and two are medium-large. Then every size in between. About Pepe...he loves to chew on "stuffies". To be more accurate, he loves to rip them open, and pull their stuffing guts out. Several months back, he decided to play this game with MY "stuffies", the Eeyores.


Poor little guys...they never did anything but look cute and be cuddly. So, off I went to the craft store, intent on purchasing some Eeyore colored "fur" to fix him up. The foot rip, I was sure I could stitch together easily without a patch. Except, nobody has that shade of gray "fur". The only fur I could find was brown, and eew, not a chance. So I started looking at other options: suede, leather, fleece. Nothing in that shade, nothing even close. But then I spied this.


Okay, I know it's crazy. But it's going to look very odd to begin with, especially if I can't match the fur. No matter what I choose, the patch will be very obvious. In that case, what better patch than a funny patch? One that's almost a spoof, or looks like a tattoo on the little donkey!

Two hours later (all while watching "New Moon" of course!), they have been healed. The pink Eeyore ended up needing a patch, and his will most definitely result in a permanently puckered scar. Something about the curve of that paw. I needed more patch in one area, but when I tried to match it up on the other side, it was too much. But the big guy... wow, his looks more like a tattoo, just like I hoped. And i cut the fabric very carefully, and chose a portion with Eeyore hugging Pooh Bear, so it's like a BFF thing! I did end up having to make the patch bigger than the hole, however, in order to not cut heads off. So, it's not as though they will not go through life without any scars of their encounter with the cocker-spaniel crossed with chain-saw. But at least they are trying to be fashionable about it!

Tuesday, March 23, 2010

Why Cross-stitch is Out

In my introductory post, I explained that I was cleaning and re-organizing my crafters stash, both because I promised my husband, and because I knew that I just had so many UFOs that I would soon be buried under them if I didn't get a bit of control immediately. Plus, the more the stash grow, the more I have to pack and move, and with an impending move, that is a sad, scary thought.

So which craft do I give up? Quilting/sewing? No. It tickles my fancy in so many ways, allows me to play with colors and patterns in a unique way, can be both machine and hand-created, and mom gave me a sewing machine. Scrap-booking? Never. First of all, I have TOO many supplies invested already, and they are not things you can typically pass on to someone else, because each one is so specific to you and your stories. Secondly, I have a nice camera, and have not yet started having children, and know I will be taking pictures when I do, so I will have hundreds of potential scrapbook pages. Crochet? Maybe. It takes a long time, I usually make baby blankets, which use little stitches or hundreds of small shapes sewn together, and if I keep the quilting, I can make baby quilts. My eventual plan there is to try to finish off the yarn I currently have, then give the rest to a knitting grandmother. Cross-stitch? Hmmm....

This poses some possibility. I have a 3 gallon Rubbermaid tote full of supplies. Two boxes of floss, all wrapped around those cards, organized correctly. At least 7 books of patterns. And 6 incomplete projects. I also have a friend who also cross-stitches, and she would love to receive a box of already wrapped and organized floss, and pattern books. We've already discussed this, and she is eagerly anticipating new patterns. (Which will be in the mail this weekend, I promise!)

So I pull out my things and decide to start with the oldest project and work forward. "Angel of the Garden" was started in 2002, or somewhere around there. Remember that project that was too badly smoke-damaged to be salvaged? Well, this is the angel I started on after that. Almost 3 years later. (I was a bit devastated by that loss) You will notice over the next few posts, especially once I figure out how to photograph cross-stitch to get the best detail, that there are several incomplete portions, and that is intentional. Her dress is white and iridescent. If I had put any white in up to this point, they would have turned gray and dingy over the last few years, sitting unattended. And while I worked, the oils on my hands would rub off, making it worse. White will be last.

This is why I am getting rid of cross-stitch: it takes FOREVER to complete even a 3"x4" area. And I thought crochet was slow. This is what she looked like Monday morning at 9:00 am. I get to work on crafts while the baby I nanny for sleeps, so approximately 3-4 hours a day. Today, at 5:00 pm, when I left, after logging 7 hours on this project between yesterday and today, all I can truly say I have accomplished is... ...a halo? Some flowers? Her head? And that was 7 HOURS!!

So, long story short, I will be cross-stitching until I die. Or it feels that way at least. In an effort to make updates more interesting, and to keep ME interested, I am going to rotate between the 6 patterns I need to complete. Set a small goal per project, meet it, change projects, and continue. And work on smaller projects of other genres at home. All in an effort to eradicate UFOs.

Sunday, March 21, 2010

Blog Inspiration


A little background into this story. I work at a junior's retail store about once a week. I am not a junior, nor am I truly junior sized. I am working on this, and have lost 4 pounds (this will NOT be a UFO!), but still, most of these clothes are not designed to fit on more average sized women. So I have been reading other blogs, and have re-styled some of my clothes to fit me, and they are super cute. And many of the girls there therefore know I am a "craft"-y person.


So, I get to work yesterday, and H says, "I have a shirt that I want you to change for me." Okay. She is currently fighting with said boyfriend, and actually would not normally wear a shirt that so blatantly declared "I have a boyfriend!". She suggests I simply draw an "X" across the heart with a Sharpie marker. Cute idea, huh? Well, without the Sharpie part, at least. "I can do that," I reply. "But rather than Sharpie, I was just reading a blog that had a tutorial on making your own screen printing, which would make it look more like the shirt came that way!"


I got my garage sale sign, and other assorted supplies from my local craft store, and began work creating the "X". Since the writing on the shirt looks painted, I decided to go with a graffiti look, and after searching the web for graffiti, and how to make it look right, I opened Paint on the computer and created this:


A few steps later, (see directions on earlier link, it's really actually easy!), and I was ready to test. Looked around the apartment for scrap fabric I wouldn't mind having a giant "X" on (who has fabric like that? not I!) and settled on my reusable grocery bag. Perfect! Looks great! On to the real thing. Wipe off the excess paint, line the "X" up over the heart, and screen-print! TA-DA!


H is happy, and now L wants me to do this to the same shirt for her, but this time, slash out the "boyfriend", and write in "hubby." What have I gotten myself into?!


What is a UFO?

No, I don't mean little green aliens and spaceships caught in fuzzy pictures that might or might not have been doctored to look like something from outerspace. In my house, UFOs are UnFinished Objects (and for me, that means crafts!). I am buried in UFOs. According to my mother, I have been drawing since I was pre-school (well, who hasn't you say?) and she has saved many of these precious works of art. Some of them, I know were not supposed to be all that great, but you know, when one leg on the teddy bear is shorter than the other, it DOES look like it's walking toward you! Or that's what she says.

In my 19 years of being a crafter, I have begun many projects, finished several of them, lost or destroyed a few of them, and laid many more aside. Which is not to say I won't ever complete them: just that now, as I contemplate orgainizing and packing my one bedroom apartment in preparation for a move in 2 months to either a 2 or 3 bedroom house with my husband of 6 months, I have a LOT of unfinished objects of art. Go on a vacation, purchase supplies to work on a cross-stitch project during trip and down-time: 5 years later, three vacations later, and it's still not complete. Begin making a baby blanket for a co-worker who is pregnant, but then she miscarries, and the project is shelved until a new baby is anticipated. Get addicted to scrapbooking, become Historian of sorority, make 3 lovely scrapbooks for the chapter, but never make one for myself, and now I have no pictures. They will all have to be reprinted.

And this is my life, now. For my New Year's resolution this year, I vowed I would complete projects, and write a journal about what I was doing. Which I did. Sorta. It's another UFO. See, what happens, and I'm sure you understand, is that I get all gung-ho about a project, and it's fun. Then I see a new project. And a new one. And before I know it: more UFOs. And then, I'm up so late working on all the cool stuff, that I'm too tired to write in the journal. BUT, since I have to load all pics to the computer to print them out for gluing into my journal....why not write the journal online! Save a step! Share my successes and failures. Get new ideas. And add to the ever increasing stash of UFOs.