Showing posts with label gifts. Show all posts

Friday, November 16, 2012

Sneak Peek at the New Baby Quilt

There it is. How cute is that going to be?
 
If you've been playing around on Pinterest, you may have seen and idea of what this will be by the end of next week. If not, you will just have to wait. I'm planning on using Wednesday and Friday of next week to work on gifts. And boy, do I have gifts to work on.  We just found out last week that another close friend is pregnant. She's 12 weeks along, so I have some time to work, but not much. She has requested that her baby blanket be crocheted, so I have to get to gettin' on it if I want to finish it in time to give at her baby shower.
 
But I got all that fabric cut last night. I'm so proud of me.

Wednesday, February 15, 2012

Happy Valentine's Day (and a quilt, too)!

Yes, I know that it's actually the 15th and Valentine's Day was yesterday, but I awoke this am at 5:40 so I could make my hubby the biscuits and chocolate gravy I wanted to make him yesterday (alas, I was without enough Bisquick). The biscuits are done, the chocolate gravy has been thoroughly enjoyed, and he has left for work. So now, I am wide awake at least an hour before I normally would be. Unless substituting, of course.

Sitting and playing around on ye ole Facebook, I saw a post from my cousin about her new babies, and said to myself, "Self, you have not yet showed the completed I-spy quilts for the twins!" Well, I can remedy that!

Two matching quilts, side by side. 88 different I-spy fabrics in each quilt, for a grand total of 176 different I-spy squares! (I have become obsessed with I-spies. That's what happens when you start swapping!)

A little bit closer detail. I used the Disappearing Nine-Patch tutorial from Obsessively Stitching, but I'm sure there are others out there. Be forewarned. If you start following Care on Obsessively Stitching, you may become as obsessed with I-spies as she and some of her followers - like me!- have become!

Here you can see the quilting detail performed by my fabulous machine quilter Jean, as well as the AWESOME striped fabric I found to make the binding with. I loved both of my binding fabrics so much, I went ahead and bought a full yard of each to make binding out of, so we'll be seeing these bindings again soon!

You can't see the quilting detail very easily in the pictures I got of the blue and orange quilt, but it is a cute half moon and stars pattern.

The newly arrived twins live about 7 hours from me, so unfortunately there are no pictures of the twins enjoying the quilts yet. But rest assured, the babies are healthy and adorable!

Monday, January 2, 2012

The DH's Christmas Quilt

My husband loves t-shirts. He also hates throwing things away. The end result? Piles of threadbare, hole-y, t-shirts with black armpits. (We also have piles of socks and boxers that fit this description, but that's for another battle, another post!) So two years ago, I began sneaking t-shirts out of the laundry. At first, it was one shirt every month or so, but last February, I amped up the sneaking and soon had a stack of his favorite t-shirts. And I knew just what I was going to do with them!

In July, I began slicing and dicing t-shirts. I also spent hours planning. In August, I began sewing. In September I became good friends with my seam ripper. During the month of October, I took a break. Then in November I panicked! Christmas was right around the corner! I wasn't finished. This realization was followed by a marathon sewing day. Then we were off to a local machine quilter. Have you figured it out yet?

Yup!! A t-shirt quilt was born. In order to get the layout correct, I had to add one of my own t-shirts (the Snoopy/rainbow) and bought one from the local Goodwill to fit the last remaing empty space (the game controller in the lower middle). Aside from that, this is 28 of his favorite t-shirts from his college and high school years. During the whole process, he realized only 3 of them were missing. All other "concerns" about missing t-shirts were smoothly deflected by my DENYING the existence of any missing shirts!

He loves it. It has replaced our tattered couch blanket, and all fuzzies love it. The big cat actually sat in the middle of the quilt the entire 12.5 hours it took me to sew the binding. DH actually had me put it on the bed Christmas evening, and we slept under two blankets that night. I am sitting under it even now. Soon I hope to finish hand-quilting my high school t-shirt quilt and begin planning my college t-shirt quilt. We will have plenty of warm, comforting quilts to remind us of days past, not stacks of t-shirts we can no longer wear cluttering up our closests!

Friday, July 1, 2011

Baby Quilt

Finally as promised......Stephanie's baby quilt!! With pics!!

Stats on this quilt:
begun: September 2010
baby shower for Steph: October 10, 2010
baby born: January 1, 2011
quilt completed: March 2011
quilt delivered: the next day!!

Eesh! The long and short of it is, I was in no way prepared to start machine quilting on a baby quilt, even it it was only 54"x54". And that discouraged me most of all. Every time I pulled it out to try again, it just aggravated me to no end until I was ready to pull out the rotary cutter and slice it up for scraps! And, well, that wasn't really an option, now was it? So I hired it out. Found someone locally who was comfortable finishing what I had started, no matter how badly it looked, and she had it completed in less than 3 weeks. Phew! What a relief.

Without any further ado....


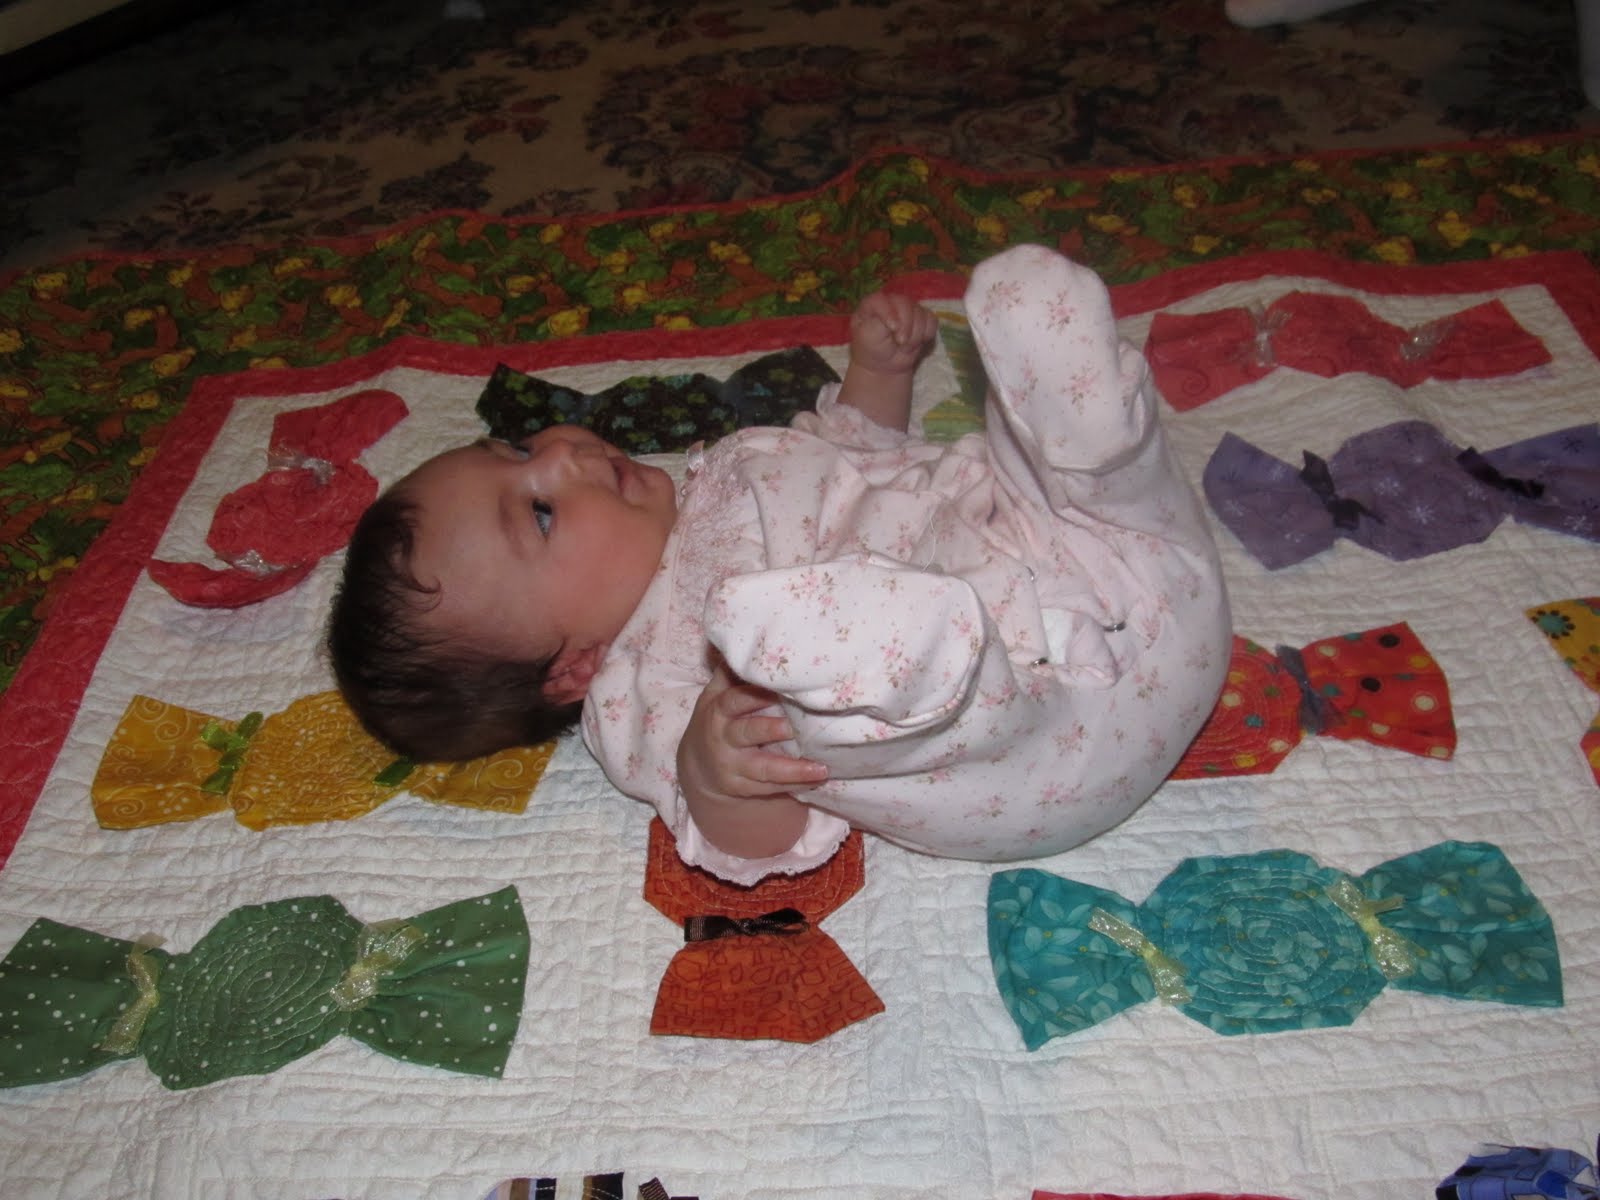
 Bright, bold, NOT baby-ish prints, surrounded by a border of monkeys.  Looking like the cutest of candy wrappers.

Look at how little she looks on the big blanket....oh, wait, she IS little!

I think she likes it. What do you think?


Wednesday, June 29, 2011

Felt Food Extreme

Hello! Lots of new stuff going on around here since I've been gone. I am just about done with my nanny job and taking an online class so that maybe, just maybe I can get a teaching job in the near future. We have not one, but two cats in the house, both rescued from the cruel world which abandons even 6 week-old babies (that would be the newest one, currently crying from her quarantine room. Only 4 more days of this!) And of course, new crafts and ideas sprouting everyday. Like for instance the Christmas present idea I had for my husband! Have to work on that when he's on night shift, and since I won't be able to complete it in front of him, will have to send it off for completion, so that's why I'm 6 months ahead.

But today I thought I'd try to complete an update to the felt food gifts I was making for my friend's 3 year old (well, she's 3 now). I took her the last box a few months ago and she had the biggest kick out of checking them all out. Then she showed me her new play kitchen set complete with all the great food. I can tell the food pieces will never be lonely, at least not for a long while.

Again, one super stuffed, medium sized "if it fits, it ships" boxes from the post office.

Breakfast: eggs in the carton, sunny-side up eggs (oh no! Her link isn't working! Hopefully I can get this remedied...these were SO not something I could have come up with on my own!), and bacon.

Halved lemons, oranges, and kiwi. What you can't see is that they have velcro centers so they can be cut apart! Oh, and the orange sort-of unbalanced the pic, so they are not shown.

"Tot-tarts", AKA toaster pastries.

Chocolate glazed doughnuts from Krispy Kreme. Because if you're going to splurge on a doughnut, it's got to be only the best!

This box also had a few extras from sets I hadn't finished with the previous set.

Um...oops. I made a LOT of food!! Didn't quite realize how much until I saw it all together.

She's quite the Southern cook! Who knows, maybe a Paula Deen in the making!


Some of these I made from others tutorials, and if so, you can find them by clicking on the link. If no link, I created my own patterns by seeing what others had done and visualizing it myself. I would like to swear that I will eventually get tutorials up on those, but lets be realistic for a while, ok? Anyway, I'll be making more soon for another friend whose daughter will be 2 this year, so that can be a goal. I will TRY to make tutorials. Just can't swear to it right now!

Friday, April 8, 2011

Baby Gifts

Lately it seems that there is something in the drinking water around here because everyone I know is pregnant. In the last 6 months I have been to 6 baby showers, with one still to come. One of those showers was for twins. It seems that all I have seen on the sewing machine lately is baby things. And I know that long ago I said I would post pictures of the things I had made for my friends baby shower so today, I fulfill that promise.

As of now, I have a basic "kit" of gifts that I give to everyone. And I don't think its wrong to say (because I've had the girls tell me so) that everyone looks forward to receiving these packages.
First a set of burp cloths. I found these at Homemade by Jill and have played around with the pattern until I found a style I like best. She made both sides with flannel and put in a layer of batting, sewing  with a 5/8" seam allowance and then cut the fringe you see on the bottom of this stack. I made several of those but didn't like the way the batting bunched when  washed. I played around with sewing the batting down first, but that became too many steps for me. Eventually I eliminated the batting and changed one side to terry cloth. I sew them right sides together and leave an opening to turn them right side out and then stitch a coordinating thread around the edge at about 1/8", with a seam down the short middle to keep them together in the middle.

This is your basic tag blanket. I will not call them Taggies, since that has been patented, but the premise is the same. If you look on the left side, you will see that I try to add a fringe or satin/lace ruffle to mine to make them slightly different from the patented brands. I would consider posting a brief tutorial on these, but there a dozen tutorials on them if there is one.

And each baby gets a receiving blanket. These are the simplest thing in the world to make. I take one yard each of two complimentary or coordinating fabrics (one is ALWAYS a flannel, although sometimes I use two flannels). Trim the selvages but do not try to square the fabric. Just lay them right sides together and pin at least 2 sides so they won't move when you sew. I usually use a 1/4" seam allowance. After they are sewn together, I trim the excess, flip right side out and sew around the finished edge like the burp cloths, then sew a free hand "x" from corner to corner.

Now this alphabet book idea came from Obsessively Stitching. This book is not a standard part of my gifts, mostly because of the time involved and the difficulty in collecting the I-Spy fabrics to match the letters. (You wouldn't believe how hard it is to find a fabric for the letter "U"!)

I will not go into too much detail on the creation of these books because Care has already posted a wonderfully easy to follow tutorial on them.  I have tinkered with it myself and now make them with white muslin backgrounds (cheaper and makes the letters stand out a bit more I think), and finally figured out how she added the handle and closure to hers. I also toyed around and made a matching Counting and Shapes/Colors book for a friend, but will have to get her to take pictures for me. Super cute and worth the time involved to make.


I did get Steph's quilt back from the machine quilter and have the binding on, am this weekend sewing the ribbons to it and the label. Hopefully I will get pictures of it up afterward, and not keep you in suspense for another month. Thank you for your patience as I try to establish a routine for writing and posting!
Happy Crafting!

Thursday, February 24, 2011

This week.....

For the past week I have been working on baby things. I tried one last time to work on the quilting stage of Steph's baby quilt, and finally threw in the towel. (I think it's funny that just now, while typing "quilting" I almost forgot the 'l' and typed "quiting")  I spent a few minutes online searching for machine quilters in the area, and found one who believed she could salvage the quilting stage.  Yay! I was just at that point where if I had put one more stitch in the quilt, I would have hated it and never wanted to see it again. And when you are giving something to you bf to use with the precious angel you love to visit, that's not a good plan, to hate the gift! So, it should be finished in about 3 weeks, and then I will bind it myself. Hey, I'm willing to spend a little more money, not a lot!

About 3 weeks ago, my husband's grandmother had open heart surgery. Knowing that we would be at the hospital for hours, I needed a small handwork project to keep me occupied. I pulled out a Christmas themed cross-stitch kit that I was only 1/4 of the way through.  Worked on that for the day of the surgery, and then took it to work so that I could stitch while the kids sleep.  The pattern calls for only a few actual cross-stitches; most of them are half cross-stitch, but the interest and detail is found in the thickness of the stitch (2,3, or 4 strands) and the blends.  I worked on that thing for 2.5 weeks before I finally finished the sky. I was determined to finish the sky. It was so large, with large chunks of one color at a time and no interest level, but if I ever started on the trees, I wouldn't want to return to the sky. Plus, with the sky complete, now the trees I'm working on can now be "happy little trees"!! Finished one tree today, and started on the first of 5 trees that are pretty similar. 

Lastly, I am trying to sew together a pile of baby gift sets so that in the future, when I get notification of an impending birth, all I have to do is run to the closet and select the colors and wrap them up.  Phew! Turns out to be quite an undertaking when my gift set is 5-6 burp cloths, one "taggie" and one simple blanket. Tonight, I sewed all the burp cloths into the first step before turning them inside out to reinforce the stitching on the outside with a complimentary color. Also turns out, I need more terry cloth. And blue.  I have no blue.  Tomorrow, I will finish the burpies and work on the simple blankets.  I will try to get pictures of the completed piles tomorrow.

Wednesday, February 9, 2011

Kitchen (Mis-)Adventures Part 1

Once again,  I have many friends who are pregnant, and one of them is suffering from severe morning sickness.  Last year, Steph and I discovered "Preggie Pops" could help her get through the nausea in the am, but they are extremely expensive.  So I set to work researching to find a recipe to make ginger flavored candy to alleviate morning sickness.  Alas, I could not find one, nor could I find a flavoring oil that was ginger flavored.  But  I persevered, and eventually modified a recipe for old-fashioned hard candy.  Which I bring to you today.

When you have completed the following recipe, you will have a batch of hard candy and a batch of candied ginger, as well as a 1/2 cup of ginger sugar, which can be used in other recipes.  I like projects like this. Three for the price of one.  Unless you experience a day like mine today, in which case you get 3 for the price of 3, including two batches that get tossed.  But I digress.....

You will need:
1 lb. fresh ginger (it should snap apart between "thumbs" and not be wrinkly or show any signs of mold)
Approximately 1.5 lb sugar
2/3 cup corn syrup
1 fl.oz flavoring oil (I use LorAnn, comes in a 1 dram bottle and you use the whole bottle)
food coloring, your choice; a few drops

Peel and slice your ginger. If it looks all cactus-y and you fear you will never get all the skin off, just break the "thumbs" off to make smaller, easier to peel and slice pieces.  As for slicing, I use my Santoku knife. It is very sharp and allows me to make very thin slices.  If you have a mandolin slicer or a slicing blade on your food processor that makes THIN slices, you can use that, but otherwise, use the knife. You will get better results.  Do not worry about the fibers.  If you are slicing thinly enough, most of the fibers will be either pulled out or chopped.  I usually end up tossing about .5 in of thick ginger root because it is heavily laden with fibers and very woody.

Put your sliced ginger root into a heavy large saucepan with 5 cups water, on medium heat. Cover and let cook 35 minutes, or until the ginger is tender.  When you look at the ginger after this point, you will probably see many fibers loose in the water...these will drain out in the next step. Drain the ginger in a colander or sieve, making sure to reserve 1.25 cups of the ginger water.  Put 1/4 cup of the reserved water back in the saucepan, setting aside the remaining cup. You will use this for the candy.

Measure the boiled and drained ginger on your kitchen scale.  Measure out an equal amount of sugar (probably approximately a pound) and add the sugar and the ginger to the water.  Bring the sugar-ginger mixture to a boil on medium-high heat. This MUST be a rolling boil, where the sugar continues to boil even as you stir the mixture.  Stir frequently, i.e. continuously. Do not let the sugar stand still in the pan or it will burn (turn dark golden brown) and you will be starting all over again.  Once you reach a boil on medium high, lower the temp to medium and continue to stir.  Soon, the syrupy mixture will begin to look dry as the sugars recrystallize.  Remove from the heat and immediately spread the ginger onto wire racks to cool.  Once cool, you will have a pile of ginger sugar underneath your wire racks.

If your sugar is coarse, just toss in the fp and give it a whirl.  Store in airtight containers.  The candied ginger and the ginger sugar can be used in gingersnap and gingerbread cookie recipes. YUM!
Wednesday, December 8, 2010

Machine Quilting Issues

No pictures today, just some talkin'.  I'm trying to remember to stop by every few days to chat, but more often than not, realize that I thought about it, and realized I had something else to do.  Making that pledge to be more open about my process right before the holiday....what was I thinking?!  Anyway, yesterday I sat down with Stephanie's baby quilt to begin quilting it for real, and boy! Do I need some practice! My swirlys are lopsided and uneven, and my bamboo-ish filler design for the sashing is....leaving something to be desired.  I'm sad to say that I think this quilt will go down as a FMQ practice quilt that I actually gave as a gift to a close friend!! Oh, the horrors! 

Currently, I am on a break after sewing for 15 minutes, trying to prevent sore muscles and frustration.  Trying to figure out how to use my fingertips to move the quilt without having to pinch it up to move it.  I wish I could steal  snag borrow mom's sewing table; it has a nice hole to drop your machine into, leaving your quilt at the level of the needle, like a perfect extension table.  I asked for a nice extension table for Christmas, not the $200+ full-sized sewing table, but the little attachments you can add when quilting.  However, even if I do receive it (HINT HINT, I WANT THAT TABLE!! ;)  it will not come before I have done most of the work for this quilt.  Sadly, DH and I jury-rigged an extension table from a cardboard box and tape, but it's not a very smooth surface, so the quilt sandwich doesn't to move as nicely as it should.

Anyway, my break-time is over, and I must return to the quilt for at least one more round before we call this evening a total KO.  Eventually, I WILL defeat the process of FMQ, but it probably won't be tonight.

Wednesday, November 3, 2010

Felt Food Mania

Okay. So I promised to do more updating and here I am. It occurred to me that I posted a while back that I had finished my first box load of felt food and mailed it off, or at least I mentioned it in the Finished column.  Yet I never posted any pictures or links to the inspiration and patterns that helped me create them.  (Many of them you will see were found at Helping Little Hands' Felt Food Cook-Along) Prepare for a bunch of links!
This box is the size of one of those medium Priority Mail boxes. And just look at what all fit into it!!

 Felt cookies from this website. No patterns were used, it's really simple. Just two cream colored felt pieces layered together with a fun frosting, sprinkled. The chocolate chip cookies were inspired by these blueberry muffins.  I loved her idea that the blueberries are not always on top, and since chocolate chips usually look the same in the cookies, I duplicated it.  After sewing the random curly-q's to the wrong sides, I sewed the right sides together, leaving a space to flip them through.  Now, I also think that they look better a bit thicker, so I used scrap batting from quilting projects to stuff them before hand sewing the cookies closed.  K says her little girl is in love with the cookies right now. 

I love these tomatoes.  I'll show you the website and pattern I found them on, but when you see it, you'll kick yourself for not seeing how simple they are! It's nothing more than a large circle gathered and stuffed.  Cut out a leafy top, sew it on and you're done! And the tomato slices were just as easy, you'll see!

I have been wracking my brain and wearing out my search engine, but I cannot for the life of me think of where I saw an idea for the hamburger and buns.  At the bare minimum, I probably saw one in a Flickr pool of felt food and was inspired to create my own pattern based out of the creation of other foods, like the sliced bread (below).  The only thing that makes the burgers cuter than a bug to me is the grill marks: black embroidery thread stitched in straight lines. I don't know about you, but my hubby never manages to get the perfect cross-hatch on a burger.

These are some of my favorite pieces, and until K's little girl got the cookies, she too was in love with the first slice of bread I made for her.  Rather than create 3 different links, I'm just going to make one, back to the Felt Food Cook-Along, because that's where all but the lunch meat came from.  The lunch meat is little more than a piece of pink felt (or 2 if you want more thickness or stability), cut with pinking shears and machine stitched around the edge for a bit of detail.  The rest of the food in the picture is the Sliced Bread, the Chicken Pieces/Chicken Nuggets in the Felt Fajitas, and The Amazing Changing Felt Pizza Crust/Tortilla. 


These bananas and corn-cobs were super fun to create! I think I need a set just to keep here at the house for me to play with!  When I make them again, I want to find a way to put magnets inside the individual pieces. When K's daughter played with them, she had difficulty getting the pieces back together.  Securing the magnets so that they won't be a swallowing/choking hazard isn't actually the issue, I have that figured out.  It's finding cheap magnets that aren't cost-prohibitive!


The carrots were super cute when finished, and I kinda went overboard cutting out orange felt, and I think I made 20-ish carrots!  The strawberries, while cute, aggravated me.  I made most of them too small, which makes them choking hazards, so I had to send her only a few, with the promise to make more, larger ones, soon.  And these oranges....I'm in love. (Here's the link for the peel)  They were actually the first food pieces I made, and they clinched it....I am a FELT FOOD MANIAC!!

Tuesday, September 28, 2010

The Height of Too Muchery

Baby shoes.  Have you ever thought about it?  They are just too-much!! They remind you of little tiny baby feet, and then you just wanna gobble them up!  So my bf Steph is having a baby girl. I have been cutting and sewing fabric like a madman (mad hatter?) for weeks, and now am finally getting a chance to put the pics on the blog.  Okay, maybe that's not all the truth.  The other piece is that dh is taking an online class and I'm lucky to be at the computer long enough to load pictures and type up my story here!  And with a job, a house to keep somewhat clean, and a dog, well, I'm just lucky to have time period!

But anyway, back to the point of tonight's post....BABY SHOES!

Now, Steph and her hubby are not your typical suburban parents-to-be.  They are not goth, or punk, or preppy.   They are one of those couples who have seriously been together for 15 years, married for 6, and they met and started dating at age 15.  Yup.  They march to the beat of their own drummer.  And they pull it off perfectly.  For example, someone gave them an adorable onesie.  Green short sleeves, with long brown sleeves underneath. It has a guitar in solid brown, no other colors, on the front.  She is dying to find some brown leggings and a brown tutu to dress Mia up in, size 6-9 months. Too cute. 


Well, her dh loves his Vans skateboard shoes.  And I found, finally, a small enough black and white checkerboard print to make some shoes for their imminent arrival (January).  I had a pattern from this website chosen to make semi-Van-like shoes from, and then I went into Hobby Lobby.  Where the awesome (evil!!!) saleslady pointed me to the Simplicity patterns that were on sale, for 99 cents!!!! I went a teensie bit overboard and bought 6, but the best find that day was a baby shoe pattern.  In which I found a perfect look-a-like for the skateboard shoes.....TA-DA!!!

I mean, really, does it get much cuter than this?  Sorry the side view is blurry, it's the best of the side views!  I have been squealing and giggling in such high-pitches that my own dh is getting a bit worried!!  I cannot wait to give these to the dad-to-be! Steph knows about them, and is just as excited (no, she hasn't seen them) but she says since they were made with him in mind, they should go to him. And I agree.  But this....
is the height of too-muchery.

Wednesday, May 26, 2010

Exciting News!

Last week, one of my best friends told me that she is expecting! Yay! They have been trying for a long time, so this is truly exciting news. The best part is, I had just last month found a quilt pattern to use to make her a baby quilt whenever I got the word. So now, I just have to restrain myself until July when she finds out pink or blue! Okay, green or pink. She's definitely more a green than a blue.

She went to the store this weekend, and the excited grandma-to-be got a few things to start the loot off right, so I even have basic colors and ideas to grow off of. She fell in love with the monkeys that are out this year. And we all know that monkey fabric is adorable and easily found right now. So, today, I just spent the last hour playing around searching my favorite blogs and their favorite blogs for ideas on other gifts to stuff a bag with. Unfortunately, now I have a list of things to make, and I can't even get started until July!!! ArgH!!!! I mean, there's a few things I could make very gender-neutral, but most of them need to be specific to ruffles or camo Vans (shoe) checks in black and white. She would KILL me for camo. In any colors or patterns.

What are some great ideas for baby gifts you have seen that you would have loved to have recieved, or think you would like, or things you would give to expectant moms.... I need ideas!!